

Trimming your puppy’s nails can feel tricky and even a little scary. But keeping those nails short is important for your pup’s comfort and health.
If you’re worried about hurting your puppy or don’t know where to start, you’re not alone. This guide will give you simple, clear tips to make nail trimming easier for both you and your furry friend. By the end, you’ll feel confident and ready to keep your puppy’s paws happy and healthy.
Keep reading to discover the secrets to stress-free nail trimming!
Credit: www.melimoyulodge.com
Choosing The Right Tools
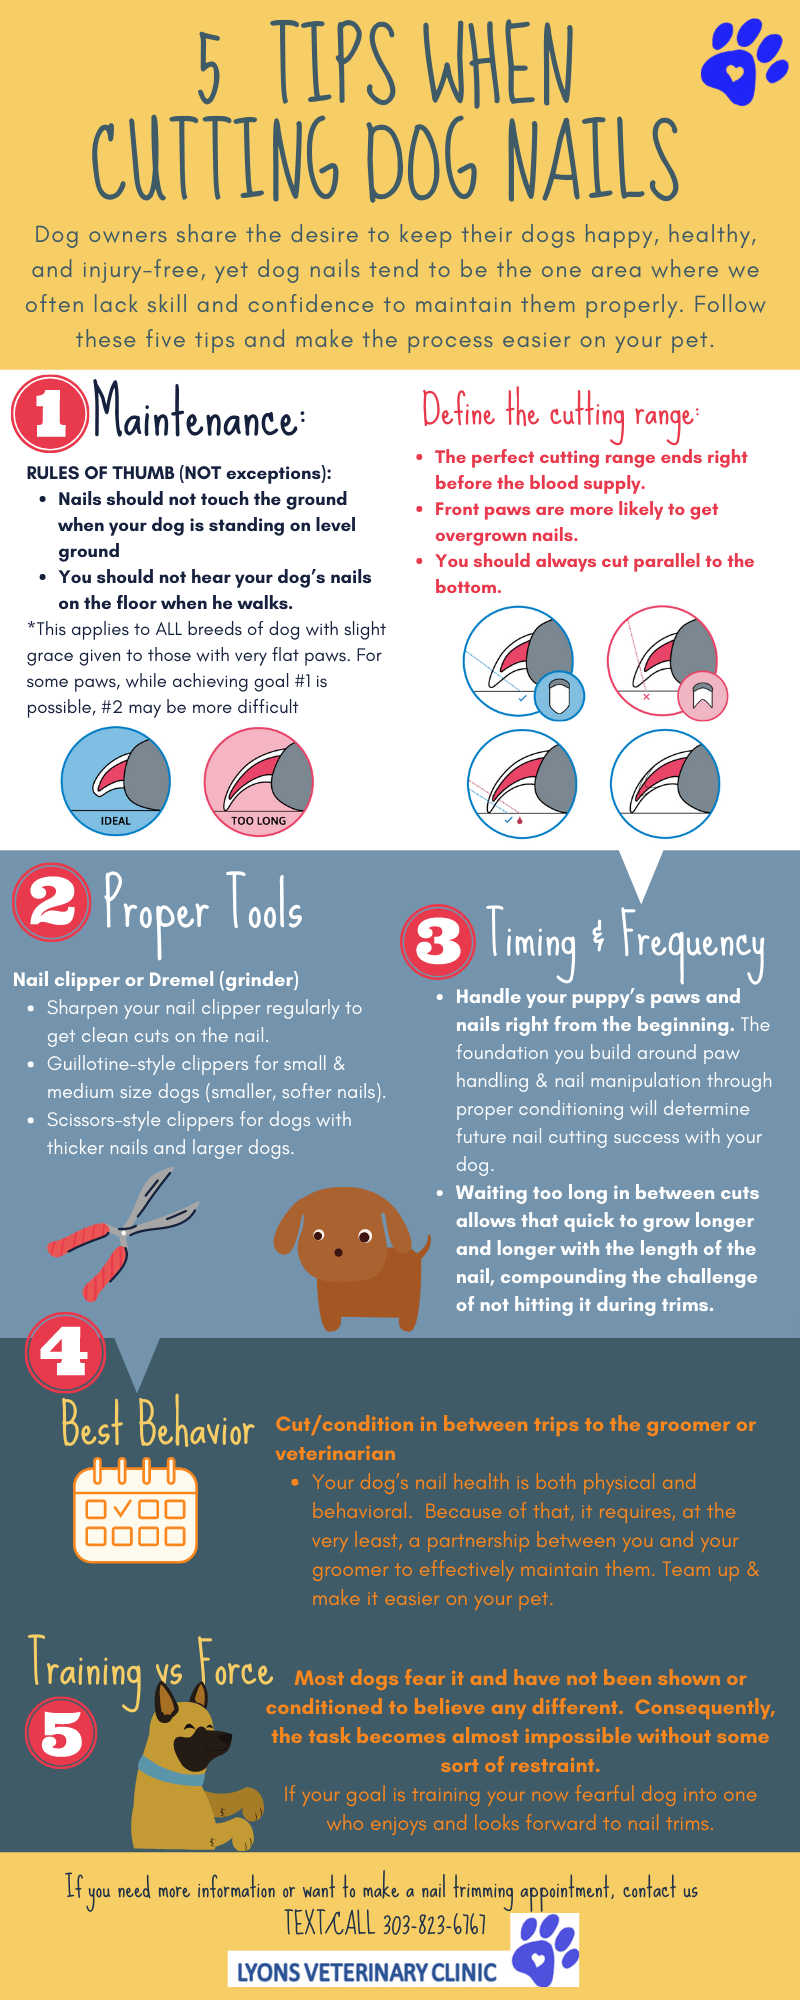
Choosing the right tools is key for safe puppy nail trimming. Using proper tools helps avoid pain and injury. It also makes the process faster and easier for both you and your puppy.
Different tools suit different puppies and owners. Some tools work better for small nails, while others are best for thick or fast-growing nails. Picking tools that feel comfortable in your hand matters too.
Types Of Nail Clippers
There are three main types of nail clippers for puppies: guillotine, scissors, and plier-style. Guillotine clippers have a hole where you insert the nail. The blade cuts the nail when you squeeze the handles. Scissors clippers look like small scissors and cut nails by closing two blades. Plier-style clippers have two handles and a strong blade. They work well for thick nails.
Choose clippers that fit your puppy’s nail size. Sharp blades make clean cuts and reduce splintering. Dull blades can hurt your puppy or cause uneven trimming.
Using A Nail Grinder
Nail grinders are electric tools that file down nails. They are quieter and less scary than clippers for some puppies. Grinders let you shape nails smoothly without sharp edges. They work well for puppies with very dark nails. Nail grinders take more time but can be gentler.
Use a grinder slowly and gently. Keep it moving to avoid heat build-up on the nail. Let your puppy get used to the sound before starting.
Gathering Other Supplies
Besides clippers or grinders, gather some extra supplies. Have styptic powder or cornstarch ready to stop bleeding. Keep treats nearby to reward calm behavior. Use a nail file to smooth rough edges after trimming. A towel can help hold a wiggly puppy safely. Good lighting is important to see the nails clearly.
Being prepared with the right supplies helps make nail trimming a positive experience.

Credit: peterdobias.com
Preparing Your Puppy
Preparing your puppy for nail trimming is key to a smooth experience. Start early to build trust and ease nervousness. Gentle practice helps your puppy feel safe and relaxed. Small steps make nail trimming less scary.
Creating A Calm Environment
Choose a quiet, comfortable spot for nail trimming. Soft lighting and no loud noises help your puppy stay calm. Sit on the floor or a low surface to appear less intimidating. Keep treats and toys nearby for positive rewards.
Getting Your Puppy Comfortable
Touch your puppy’s paws often without trimming. Gently hold their paws and rub their nails. Praise and reward with treats to create good feelings. Stop if your puppy pulls away or seems scared. Repeat this daily to build trust.
Introducing Nail Tools Gradually
Show your puppy the nail clippers or grinder first. Let them sniff and explore the tools at their own pace. Use treats to reward calm behavior around the tools. Try touching the tools to their paws without clipping. This step helps reduce fear before actual trimming.
Trimming Techniques
Trimming your puppy’s nails requires care and the right techniques. Doing it gently helps keep your puppy calm and safe. Learning the proper steps makes the process quicker and less stressful. Use these tips to trim nails the right way.
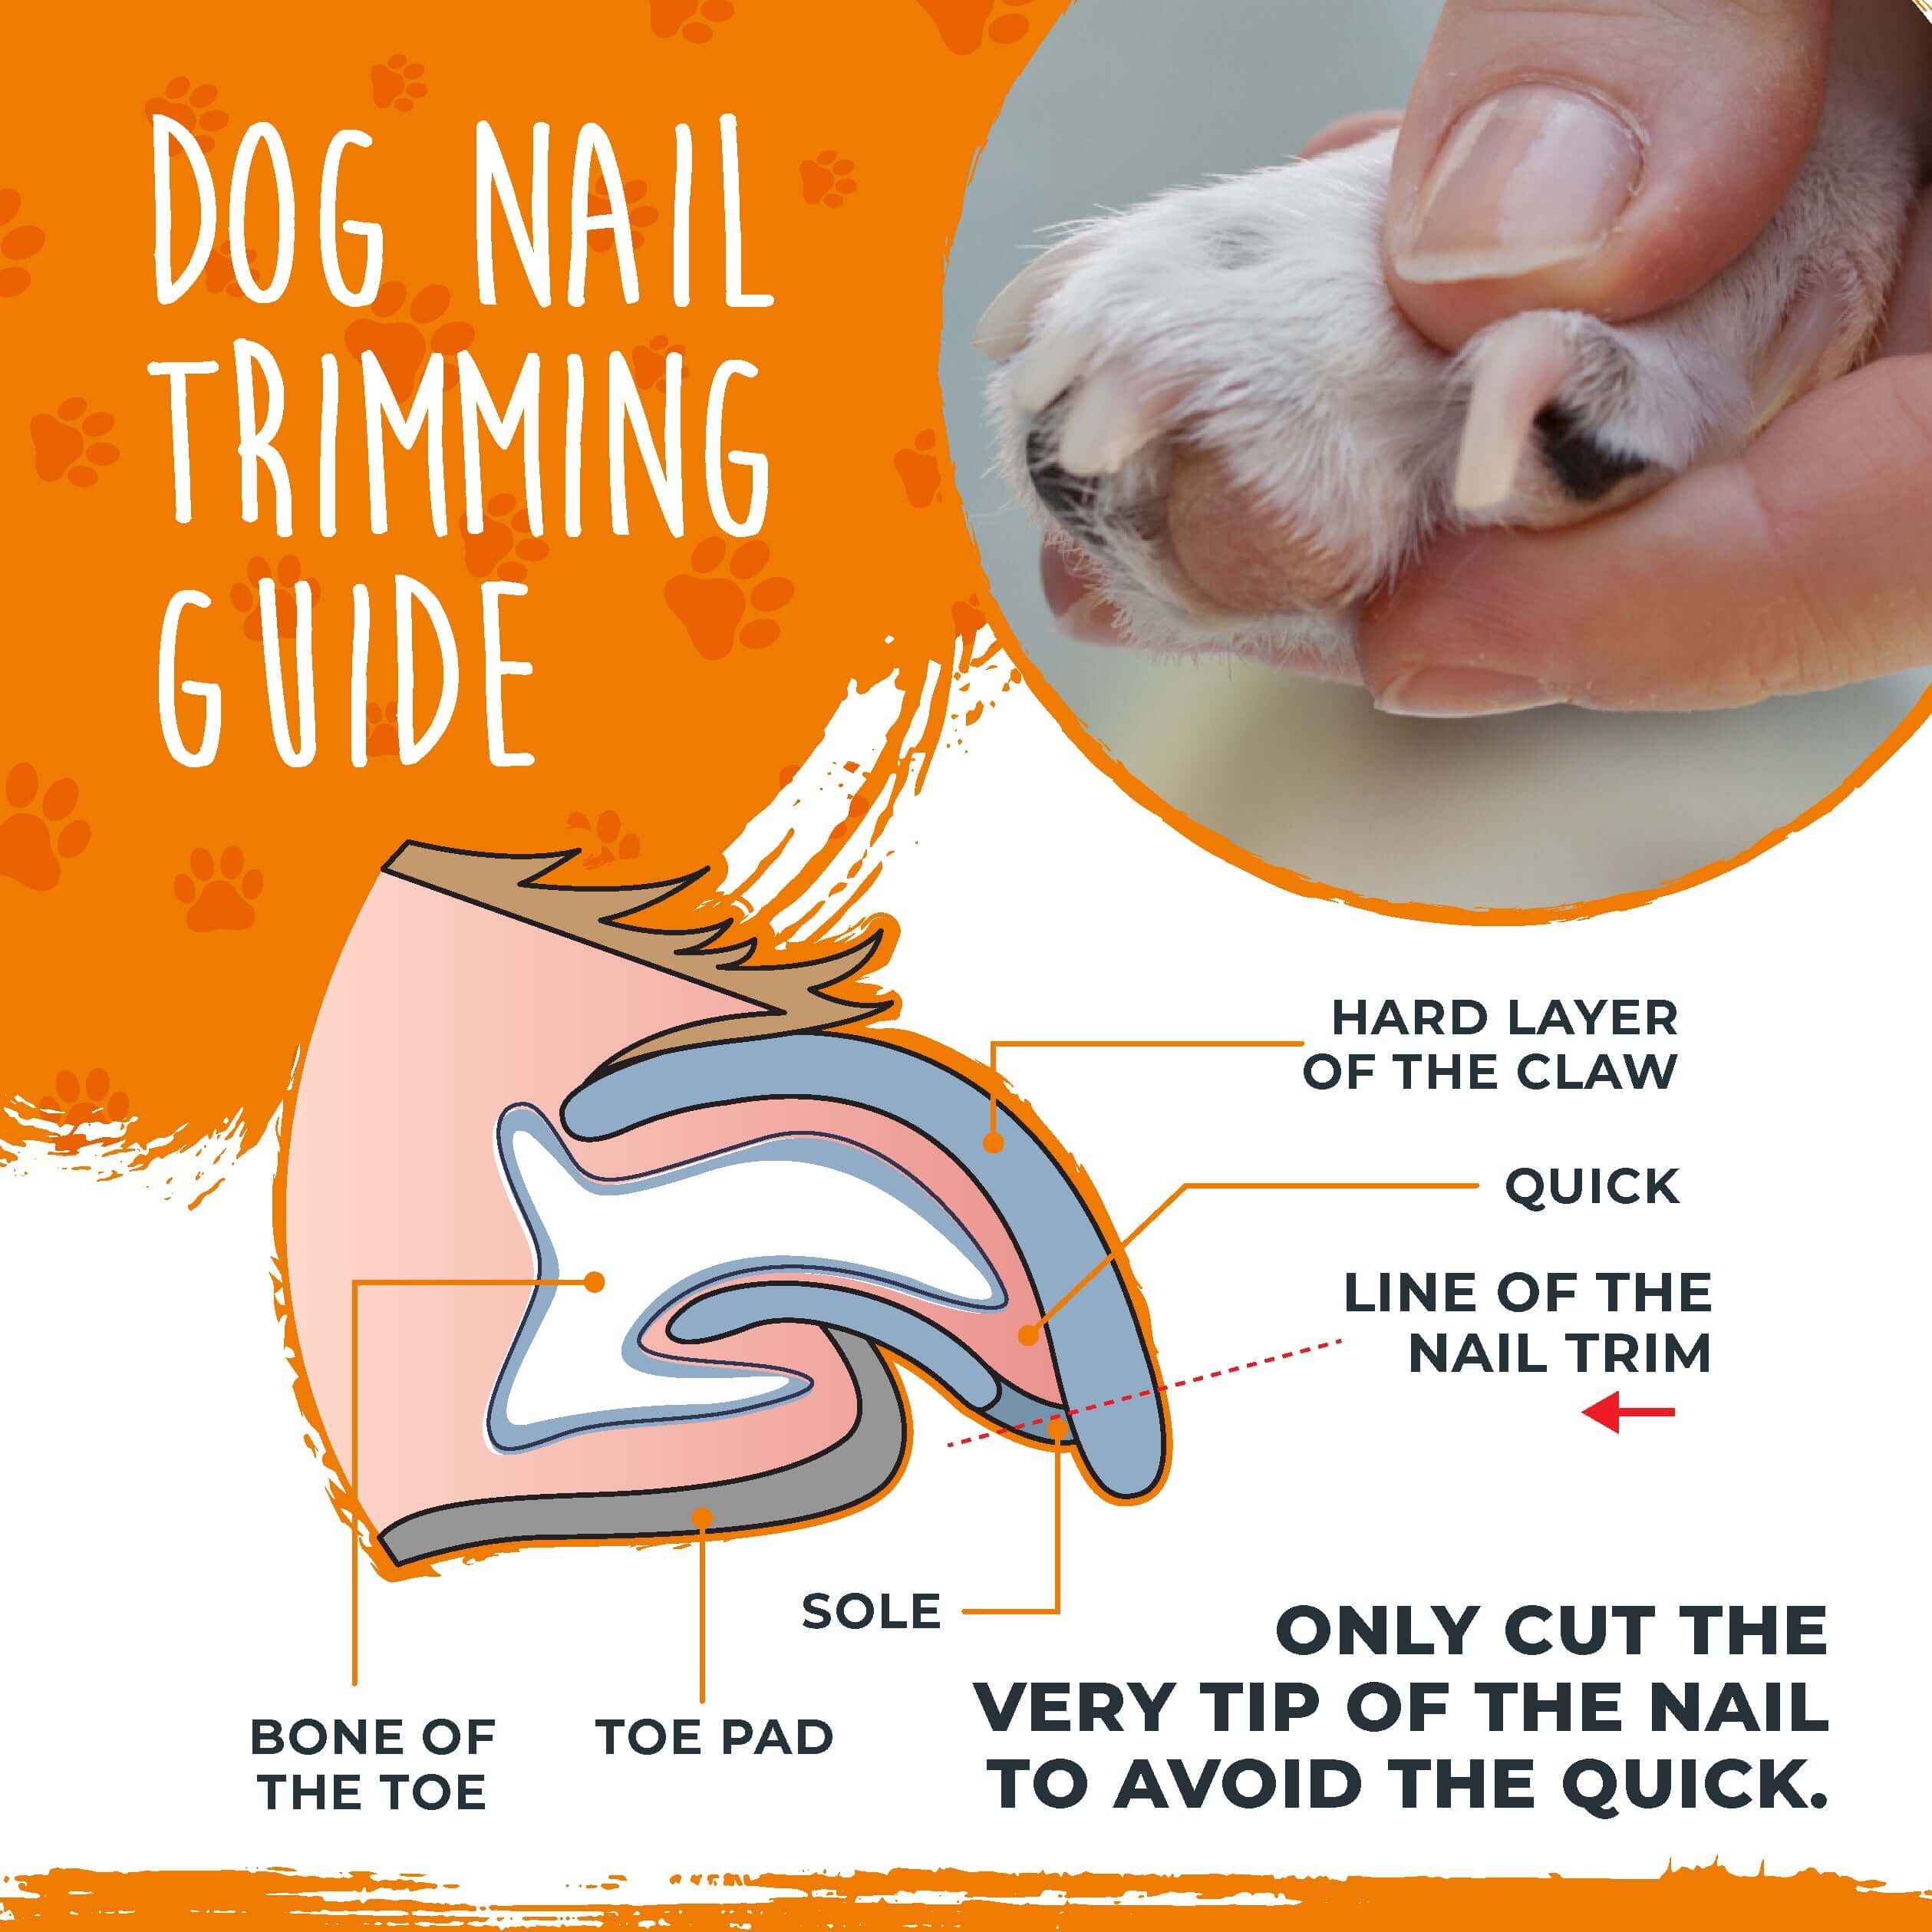
Identifying The Quick
The quick is the pink part inside the nail. It has blood vessels and nerves. Cutting the quick causes pain and bleeding. For puppies with light nails, the quick is easy to see. Dark nails need extra care and small cuts. Trim little by little to avoid hitting the quick.
Proper Clipping Angle
Hold the clipper at a 45-degree angle to the nail. This angle helps prevent splitting or crushing the nail. Cut the tip straight across, not too deep. Avoid cutting too close to the skin. Stop if you see a dark spot inside the nail. Keep the clipper steady and use quick, gentle cuts.
Handling Difficult Nails
Some nails are tough or your puppy may resist. Stay calm and speak softly to soothe your puppy. Use a towel to hold a wiggly puppy gently. Take breaks if your puppy gets scared or restless. Try trimming after a walk when your puppy is tired. Reward your puppy with treats for good behavior.
Preventing Stress And Discomfort
Trimming a puppy’s nails can be stressful for both puppy and owner. Keeping the experience calm helps the puppy feel safe. Stress makes the puppy resist more. Comfort and patience make the process smoother. Focus on gentle handling and positive moments.
Using Positive Reinforcement
Give treats during and after nail trims. Praise your puppy with a soft voice. Reward calm behavior to create a good habit. Use toys or playtime as rewards. Positive reinforcement helps your puppy enjoy nail care.
Taking Breaks When Needed
Stop if your puppy looks uneasy or restless. Short breaks prevent fear and discomfort. Let your puppy relax before continuing. Gradually increase the time spent on each session. Small steps build confidence and reduce stress.
Recognizing Signs Of Stress
Watch for yawning, lip licking, or shaking. Avoid pushing if your puppy pulls away. Heavy panting or whining signals discomfort. Notice changes in body language and stop if needed. Understanding stress signs protects your puppy’s well-being.
Aftercare Tips
After trimming your puppy’s nails, proper care helps keep them calm and safe. Good aftercare prevents problems and builds trust. Here are key tips to follow right after nail trimming.
Dealing With Bleeding
Sometimes, nails may bleed if cut too short. Use styptic powder or cornstarch to stop bleeding quickly. Press gently on the nail tip for a few seconds. Keep your puppy calm and still during this time. Avoid panic; bleeding usually stops fast.
Rewarding Your Puppy
Offer treats and praise to your puppy after trimming. This creates a positive link with nail care. Use soft treats your puppy loves. Speak gently and pet them to show good behavior. Rewarding builds trust and makes future trims easier.
Maintaining Regular Trimming Schedule
Trim your puppy’s nails every two to three weeks. Regular trims keep nails short and healthy. Check nails often for length and sharpness. A routine makes your puppy used to the process. Consistency reduces fear and discomfort over time.
Credit: www.lyonsvetclinic.com
Frequently Asked Questions
How Often Should I Trim My Puppy’s Nails?
Trim your puppy’s nails every 1-2 weeks. Regular trimming prevents overgrowth and discomfort. Short nails improve walking and reduce injury risks.
What Tools Are Best For Puppy Nail Trimming?
Use sharp, small nail clippers designed for puppies. Guillotine or scissor-style clippers work well. Ensure tools are clean to avoid infections.
How Can I Calm My Puppy During Nail Trimming?
Use treats and gentle praise to relax your puppy. Trim nails slowly and take breaks if needed. A calm environment helps reduce stress.
What If I Accidentally Cut My Puppy’s Quick?
Apply styptic powder or cornstarch to stop bleeding quickly. Keep calm and avoid panicking. Prevent this by trimming small nail sections carefully.
Conclusion
Trimming your puppy’s nails keeps them healthy and happy. Regular care prevents pain and injuries. Use gentle tools and stay calm to ease your puppy’s fear. Take breaks if your puppy feels nervous. Practice often to build trust and skill.
Remember, patience helps both you and your puppy. Healthy nails mean better walks and playtime. Start early for the best results. Keep it simple and safe every time. Your puppy will thank you with wagging tails and bright eyes.


